Sound Design For Visual Media - Tutorial Notes Ep06

Episode 06: Sound Design Tips Using EQ Plugins
Overview
This episode and the next are dedicated to EQs and Compressors, the salt and pepper of audio production! We’re gonna focus on EQ'ing more than Compressors, as both are vast topics. We will briefly mention compression, but I will leave most of that for the next episode.
We'll be using some of my recordings as examples. First we will EQ a rain recording to make it suitable for use as a BG/Bed Track, then we will sculpt the EQ of a sound Effect, and finally I will show you some simple EQ tricks to achieve certain effects that directors often ask for, like how to make things sound like they are muffled, further away than recorded, coming from within a box or a room, or how to achieve the 'phone' sound.
The video assumes at least a preliminary knowledge of EQ on your part, but if you don't know what it is, below is an explanation. Feel free to skip this part if you already fancy yourself knowledgable on this topic, but have a quick read below as I will introduce a good number of common terminology surrounding EQs which you may not know. As long as you have a basic understanding of what EQs are, the video should be useful to you. Otherwise, read below for a crash course.
What's an EQ?
EQ is short for equalizer, and it's any type of plugin that allows you to attenuate (turn down) or amplify (turn up) specific frequency bands within an audio file. Natural sounds that occur all around us, aren't made up of one frequency, but a number of different frequencies, each contributing to their overall tone, envelope and character. When we record a sound, it's never a perfect replica of what we heard naturally. After all, our ears are the perfect microphones and our brains the perfect audio processor. Microphones don't even aspire to come close to our ears when it comes to capturing sound, so EQ plugins become a crucial tool for audio production, so that we can further modify recorded audio. They can also help us modify sounds and sculpt their frequency content to our liking.

Pictured: A graphic equalizer (Waves G-EQ Modern). You probably had one of these on your stereo back in the 90s, though maybe with not as many faders! Each fader is essentially a volume control for a specific range of frequencies. So in the image, you have one fader for 25-31Hz, another for 31-40Hz and so on. There are two rows here because this plugin allows for separate equalization of two channels. Above the faders is a visual representation of what the EQ curve looks like. The X axis shows different frequencies and the Y axis shows amplitude (or loudness) of each band.
To understand how EQs work, let's first look at the various parameters you may find on an Equalizer:
Band Number: Each EQ provides a number of frequency bands. A band is a subset of all audible frequencies (20Hz-20kHz, though some EQs go below and above these amounts) which you can control independently. A 5-band EQ, for example, splits the entire frequency spectrum into 5 bands, and allows you to control Each one independently.
Frequency: A frequency parameter allows you to specify the centre frequency for each band. Sometimes plugins instead allow you to control the border frequency between two bands, so if your border frequencies are set at 50Hz, 120Hz, 1000Hz, and 4000Hz, then your centre frequencies are 35Hz, 85Hz, 560Hz, 2.5kHz, and 12kHz. We are assuming 2 additional borders at 20Hz and 20kHz, and then dividing the difference between two border frequencies in half, adding that number to the lower border frequency value.
Gain: Gain is the amount we want to boost or attenuate a band. They usually default to +0.00dB and go up to +18dB or down to -18dB in most common EQs
EQ (Curve)/Filtering Type: Above and beyond turning things up or down, some EQs allow for specific EQ shapes. The most common shapes are:
-Low-Cut aka High Pass Filter: In this type of Equalization, we are specifying a frequency, and cutting all the frequencies below that. The amount of attenuation is decided by the Q, Bandwidth, or Pole Value. These are expressed with the dB/Octave Unit, so a Low-cut EQ at -6db/Oct on 100Hz will reduce every frequency below 100Hz, but that reduction is 6dB at 50Hz (one octave below 100Hz) and -12dB at 25Hz (two octaves below 100Hz) and so on. You may sometimes hear them referred to as a 1-Pole Filter. Each Pole is 6dB/Oct so a 3-pole filter has a curve of -18dB/Oct and so on. This terminology comes from vintage synthesizers.
-High-Cut aka Low Pass Filter: The opposite of a Low-cut, so this EQ type cuts all frequencies above the specified frequency. So a 2-Pole LPF at 10kHz will cut the audio by 12dB at 20kHz, in a linear fashion.
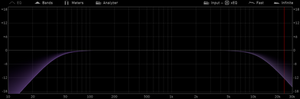
A typical low-cut (left purple curve) and hi-cut filter (right purple curve)
-Shelf EQ: A Shelf EQ works like filters, in that the Frequency dictates the cut-off point, but unlike filter it can also boost frequencies. The 'Tone Control' knob on consumer-grade audio playback devices is often a shelf EQ. So when you boost the Bass on your device, you are simply applying a shelf EQ.

A Low-Shelf EQ (Blue Curve) boosting frequencies below 200Hz.
-Bell EQ: Bell EQs get their name from their shape, which is similar to a bell. They can boost or attenuate any frequency band based on Centre Frequency & Q (Bandwidth). These are the most versatile EQ type, and are used for a majority of surgical and creative EQ applications. A close cousin of the Bell EQ in some plugins is Steep Bell/Narrow Bell EQ, which is the same thing, with a much narrower Q.
Q/Bandwidth: Q and Bandwidth are technically not the same thing, in fact they are exactly opposites, but as far as practical application, they do the same thing and are only different in terminology in different EQs. Here's a quick explanation: Say you have a Bell EQ with the centre frequency of 200Hz that you boost 3dB. Q/Bandwidth dictates what you want the EQ to do with the neighbouring frequencies above and below 200Hz. The higher your Q value is (or conversely the narrower your bandwidth), the fewer frequencies before and after 200Hz are affected. The lower your Q value is (or conversely the wider the bandwidth) then more frequencies around the centre frequency are affected. A steep Bell EQ does the most amount of attenuation/amplification at the Centre frequencies, quickly dropping in intensity around the centre frequency. A wide Bell EQ does the same amount of attenuation/amplification, but it affects the frequencies around the centre frequency as well, only gradually dropping at some point before and after. This is very hard to articulate, but very simple to understand when you see it:

Pictured are two Bell EQs, both boosting. On the left, the green Bell EQ has a low Q (wide bandwidth) with the centre at 200Hz but it's also boosting frequencies below and above 200Hz, down to 20Hz and up to 2k. The amount of boosting decreases as we move away from the centre. On the right, the blue Bell EQ is a high Q (narrow bandwidth) so it's boosting 5kHz but quickly dropping the amount of boosting around the centre, only going down to about 2.5KHz and up to 12KHz.
EQ Types
If this all feels overwhelming to you, then you probably want to use visual EQs that allow you to simply move points and draw curves, rather than dial these amounts in. Speaking of which, EQ plugins come in many different forms. Here are some of the common types:
Graphic Equalizers: Graphic equalizers (like the Waves Modern G-EQ pictured at the top of the post), are a type of equalizer with fixed bands, meaning that they don't allow you to change the centre frequency of their bands, nor the bandwidth. They have a set number of bands at specific frequencies and Qs and you only control the Gain. The upside is that you are only using one parameter (gain) to control them, and the end result is a curve that resembles the lines drawn between the bands from their fader position, hence the name graphic. The downside is that they are not the most customizable. They are commonly used in tuning studios, on amps and other consumer-grade audio devices thanks to their user friendliness.
Semi-Parametric Equalizers: Semi-Parametric EQs are the oldest type of EQs. They have a limited number of bands (3-7) and each band has adjustable frequency and sometimes Q values, but these adjustments are only available for set intervals. Once again, seeing one makes describing them way easier:

The API-550A Equalizer by Waves, an emulation of a popular hardware EQ. It has 3 bands each controllable with 2 sets of knobs. The grey outer knobs control the gain of each band, while the blue inner knobs adjust the centre frequency. Notice that you are limited to 5 centre frequency values for each. So you can choose, say for the low band, 50 or 100Hz but not 75Hz and you can't go above 400Hz.
Semi-Parametric EQs are neither as user friendly as Graphic EQs nor as fully customizable as fully parametric EQs, but they are still coveted for their amazing sound in many applications. Also, while you can't fully adjust the centre frequency, the values they allow you to switch between are often carefully selected by engineers to be particularly musical and characteristic. Fully parametric or graphic EQs can sometimes have beginners rely on their eyes too much. Semi-Parametric EQs force you to use your ears, and their carefully calibrated nature means you are less likely to cause problems. They certainly have their place in the EQ realm as some of the most legendary EQ types and are from from being obsolete.

the PuigTec EQP1A by Waves, another emulation of a legendary Semi-parametric EQ named Pultec. These vintage EQ types still routinely sell for tens of thousands of dollars! This particular model is legendary for its ability to create a resonant shell in the low end by boosting AND attenuating the same band simultaneously, making it a not-so-well-kept secret of audio engineers for Kick Drums and Bass.
Parametric Equalizers: Parametric Equalizers are fully parametric, meaning they allow you to fully customize each of their bands' frequency, Q and of course, Gain. These are the most modern type of EQ and usually feature a visualizer, which is handy for viewing the waveform broken down by frequency and amplitude, and allow for full customization of your EQ curves. Every DAW comes with its own stock version of this EQ type (ReaEQ for Reaper, Digital EQ in Logic, EQ-7 in Pro Tools and Ableton) and they are often the EQ most people learn on. While their full customizability makes them a go-to for many engineers, and their visualizer makes them the most user-friendly for beginners, all their customizability makes them also the most privy to errors. Doing whatever you want to an audio file means you can do a number of things that are ill-advised. You also need to make sure your eyes aren't dictating your EQing rather than your ears. I often see people refrain from doing proper Equalization, say boosting an amount fully, because it makes the shape look weird, and that's not really a good argument for why you should or shouldn't set certain values. Working with parametric EQs is an art form unto itself, and the entire episode, we will just be working with those.
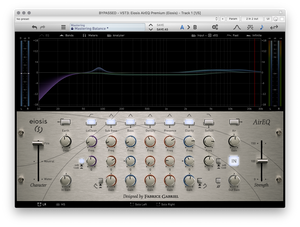
My personal go-to EQ for a majority of my EQ applications, from sound design to mastering to mixing, the Eiosis Premium EQ is magic! It's fully customizable along 7 bands, with two additional bands called Earth and Fire for boosting Low and High-end, the ability to solo bands, presets that actually help you learn, dynamic Q processing, and many other features I can't live without! This EQ deserves its own video and blog post!
So that was a brief but hopefully thorough explanation of EQs. There are of course tons more we can discuss, like dynamic EQs which bridge the gap between EQ and compression, AI-based EQs like iZotope models, mastering EQs and so many more, but the explanation above should be enough to get you started. You also need to have some EQ plugins and it's important to have one or a few go-to EQs that you can easily work with and pull up. If you already have some, get to know them well. Read the user manual, work with them a lot, and get familiar with different applications you can use each one in. If you don't own any plugins, simply master the one on your DAW. For years I used nothing but the Pro Tools stock EQ and it still remains one of my favourites. If you have some money to spend, Waves, iZotope and Eiosis make most of my favourite plugins and are worth every penny. Otherwise, leave a comment below if there are any I missed.
EQing in music vs. EQing sound effects
A lot of people who work on Film, TV and video game sound, come from a background of music producers, mixing engineers and musicians. Something to know is that EQing Sound Effects is vastly different from EQing musical elements in a song. With music, we are achieving different tones, and may even use EQs to create and accentuate certain types of resonance. With Sound Effects, we are mostly trying to use EQs surgically, that is, to use them to improve our field recording while, and this is very important, maintaining their overall naturalness. Another way EQs can be used is when trying to modify a recording to work within our movie, so maybe we want to EQ sounds to sound as if they are being heard from behind a glass window, or from further away than where they were recorded. That's why I find many music producers, when they transition to film, need to unlearn some practices when it comes to EQing. I will explain more in the video.
The average human being may not understand EQs but they know a synthetic sound when they hear it. They have an almost unconscious understanding of what rain, or a door closing sounds like, and their attention piques when something doesn’t sound “right”. While EQs do allow for us to sculpt almost any sound to any other sound, with sound effects, we want to refrain from doing anything too drastic, because that will be noticed by the audience. The aim of sound effects in most movies is to immerse our audience, so we don’t want to attract any unwanted attention to the audio we place in a film, and distract from the story. So while your knowledge of Musical Equalization will definitely help you here, there are some practices that you need to somewhat unlearn from your music making days for EQing sound effects.

You should refrain from using very steep EQ curves and very drastic boosts in many sound effect applications where realism is key, because those usually result in a synthetic sound with very resonant frequencies, which can be jarring and go against the goal of sound design in films, which is usually to immerse the audience in a world.
Conclusion
So here we are! The info provided in the blog post and the video together will, hopefully, be more than enough to get you started on your journey to master EQs. They are a very basic step in Sound Design but by no means the easiest. EQing and training your ears to break a sound into separate bands is a life-long educational journey, and I'm simply sending you off on this journey. You need to do your own studying, but more importantly, your own EQing, so that you can gradually train your ears and master the EQ plugins in your arsenal.
Watch my entry for the SOE sound design competition, which I won here:
I will soon be releasing some EQing quizzes and some ear training exercises on the quiz section of my website. I found a common problem with most of these quizzes which I'm trying to tackle with mine. That said, you can find some of these quizzes and ear training tools below:
-Audio Training app
-LANDR 8 Ear Training Apps
Watch the video for this week's episode below:
Finally, if you find my tutorials, these blog posts, and the quizzes useful, please consider leaving me a tip on my blog page or the Quiz page. I am currently finding myself with very little work thanks to the Pandemic, and making these tutorials requires tons of work, which I will happily do forever and provide you with this info for free. That said, if you can tip me it would help me immensely and go towards helping me make more of these without going homeless in the process!