How I Sound Designed a whole video in 14 Hours!
During my year studying Sound Design at Vancouver Film School, we were given a number of very interesting assignments, all of which would put the students in real-life situations that we may run into at the industry. The 'Test Video Package' assignment was one. You can watch it here:
We were given this video and tasked with doing the Sound Design in 24 hours! We were also given a limited number of sound files to use as base sounds (a pre-selected 2GB set of sounds from the school's SFX Library), and encouraged to use DSP and Waves Plugins to make them sound unique and fit the visuals.
This was a really fun and challenging assignment, being limited both by time and the quantity of raw audio to work with, while simultaneously being freed from the shackles of working under an SFX mixer, and being able to use my own layout and effects. I planned and executed the project in multiple stages.
Cataloguing & Spotting:
My first step was to create a catalogue and audition the Soundbank to see what I was working with. As I listened, I thought of what other things each sound can be used as, or how I can manipulate them to further widen my palette, and wrote those down as Database Comments:

Screenshot of my Catalogue and the comments section with ideas and different “interpretations” of the raw sound.
I created 4 “Spot” Tracks in the project. I went through the video frame by frame, Created blank clip groups and wrote down the “events” that occurred on screen and adjusted the clip group so it covers the duration of the sound, so I'd know what sounds I need. This also served as my “Guide” to track my progress and keep track of shot changes.

Snapshot of my “Spot” tracks.
Right off the bat I noticed that, while Palette-wise we had a lot to work with, There was not a lot of variety. I knew that I had to create variety before I can start editing. The easiest example of this was with the Camera Flash. We had one Camera Flash sound but the video features 10+. I didn’t want to just rely on pitch shift to create variety so I created a Kontakt instrument as shown below:

A Kontakt multi-Instrument
I noticed that the tail end of “GlassBreakShards” has a strangely click-y and mechanical quality to it. I thought to have random slices of that file play at the end of the camera flash sound, creating a different tail. Using the Release Trigger function in Kontakt, I had even more expressive control over where the clicks occurred ie they could almost happen simultaneously or way after the initial flash sound.

My Attack would Trigger the Flash sound, and the release would trigger the shard “tail”.
To create more variety with my Engine Revving sounds, I used a combination of pitch shifting, Transient re-shaping, and Waves Plugin “Enigma”. Enigma, in the simplest terms, is the marriage of a multi-band notch filter and parallel modulator with extra Delay and Modulation features for Coloration and Spatialization. It lets you define a number of notches at set intervals, then sweeps through the frequency spectrum at customizable directions and rates, maintaining the notches’ distance to each other. In essence it can take a static sound (like an engine idle) and turn it into a similar dynamic sound (a revving engine). The above sounds are quite similar in envelope and frequency content, but the idle sound is the engine spinning at around the same rate, while revving is the rpm rapidly fluctuating, which is perceived as sweeps in the frequency spectrum.
It can also create the illusion that the sound is moving away from the listener because of the same acoustic phenomena. I intend to make a more in-depth video tutorial on Enigma in the near future.

The blue curvy line moves through the spectrum and back to point A at the rate set by the Sine LFO on the top right.
Sound Design:
I knew that in order to set my project apart from the rest I had to rely heavily on DSP but also try to avoid my first instincts when designing sounds, as that first instinct would probably occur to others and they'll probably use it. I knew for example, that most people would reverse the cymbal sound and use as a swell, so I thought to make my swell sound different. I used another Wave Plugin, “UltraPitch”. A cymbal sound contains very “asymmetrical” frequencies. In other words, it's not a harmonic sound with overtones being neatly arranged at perfect integer ratios, so I thought if I stacked harmonious pitch shifted versions of the sound and play with the formant of the sound, it will sound interesting:

The pitch shift intervals create a simple minor triad.
Elsewhere I just took the same Sound, pitch shifted, chopped and stacked them to sound like a bunch of cars preparing for a race.

A snapshot of my Pro Tools Session
Not every moment of every projects needs to be designed using heavy DSP. Not only is it time-consuming, but it also takes away from the impact and 'wow' factor that you can otherwise achieve by sparsely using DSP.
Side-Note: As you can see above, in this session I grouped sounds of the same type to make navigating through the session, as well as mixing it, easier down the line. I think the importance of keeping organized is often overlooked by junior sound designers, but it saves you a lot of time and headache, looks professional, and makes it easier for others to collaborate with you. All the genius sound design you may do won't save you from being scolded if you hand in messy edit sessions to the mix stage or clients.
For Whooshes, I bounced three sounds together: The Puma Growl, The Fire sound, and various Car by sounds, and put them through Waves plugin “Doppler”. Doppler simulates the acoustic phenomena of the same name by applying envelopes to volume, pitch and pan of incoming audio. It also applies Reverb and Air Dampening to amplify the effect. Doppler is a great tool and provides you with an amazing visual interface to control timing and amounts of these envelopes to your needs. These Whooshes were used throughout the project to simulate movement through the otherwise “Frozen” visuals.
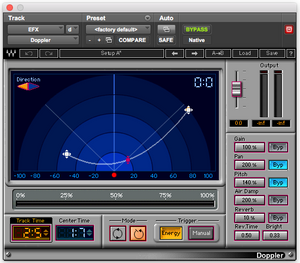
The X axis represents the amount each parameter is adjusted relative to the value at the centre. The white curve indicates the trajectory of the sound.
For Stingers and Booms, I used Extreme compression, pitch shifting, as well as another waves plugin “MaxxBass” which amplifies the overtones of the sub-bass sounds to create the psychoacoustic effect of “Heavier” sounds.
Layering:
I also used layering to “Beef up” my sounds as well as make my Engines sound alive and interesting. I added the Puma Growl to the Engine sound, exploiting yet another psychoacoustic “trick”. When we hear the growl of predators, we unconciously enter a mental state of “Fight or Flight” and this lends itself to a more “edge-of-the-seat” Experience.
Ambiences:
I had very little to go on in terms of material that could create a bed-like ambience, but I made use of the more complex and textured sounds in the bank (The screeches, the Church Bell, etc.) to lay down a bed upon which the rest of the track lay. These are all placed in the Stereo Tracks 9-16 for ease of mixing down the line and cut for perspective.
FX Processing:
It was important to me to make sure whoever opening this later (Could just be me in the future) wouldn’t need to own all the plugins used, so I created a series of busses and a number of Aux Channels containing the effects I used. When I needed to process a sound, I would either “Bake it in” or I could record the output of the bus containing the plugins and put it in the session. This was great as I basically could mix the Dry/Wet Balance OR elect not to use any of the Wet sound if my sound design went too far south. These were mostly Reverbs that I put on Camera Flashes, Engine sounds, and other Diegetic sounds, as well as The final Waves Plugin Star of the project, Valhalla Frequency Echo. Valhalla is a combination frequency shifter and multi-band delay. This was mostly used on the Intro and the Outro.

While the sounds were playing, I would adjust the Shift and Delay knobs in real time to create cool warble-y effects.
Other than the above, there is a ton of sampling, EQing, Chopping and Compression involved in the project, some of which are too routine to explain or were approached more holistically and as such are hard to explain. While I try to approach DSP and mixing through theory and understanding, there’s another side to me that likes to just manipulate sounds and ask questions later. Hopefully I’ve maintained a balance between the creative and technical side of sound design in this project.
Layout:
16 Mono and 16 Stereo Tracks
Mono Tracks 1-16 include all SFX grouped according to type and laid out ‘checker-board’.
Stereo Tracks 1-2 include printouts of Effects, %100 wet.
Stereo Tracks 3-8 include Stereo Sound Design that aren’t necessarily tied to an event.
Stereo Tracks 9-16 are where the ambiences live.
Mixing:
Once the editing was done and the layout organized, I mixed the session down an used panning, volume and plugin automation to achieve a balance. This was ultimately not a mixing assignment, but it's become standard practice in the industry to pre-mix your work with basic panning and volume automation in order to avoid clipping and save the mixer some time.
Conclusion: I hope you enjoyed the video and learned some things from this blog post. Stay tuned for more blogs like this in the future!
-Arya Afshar, IDDQD Sound